Category: Game Programming

PIX

One of the reasons I haven’t been posting updates on Planitia is because I’ve had this weird graphical bug that I haven’t been able to get rid of. How bad is it? Well…here, see for yourself:
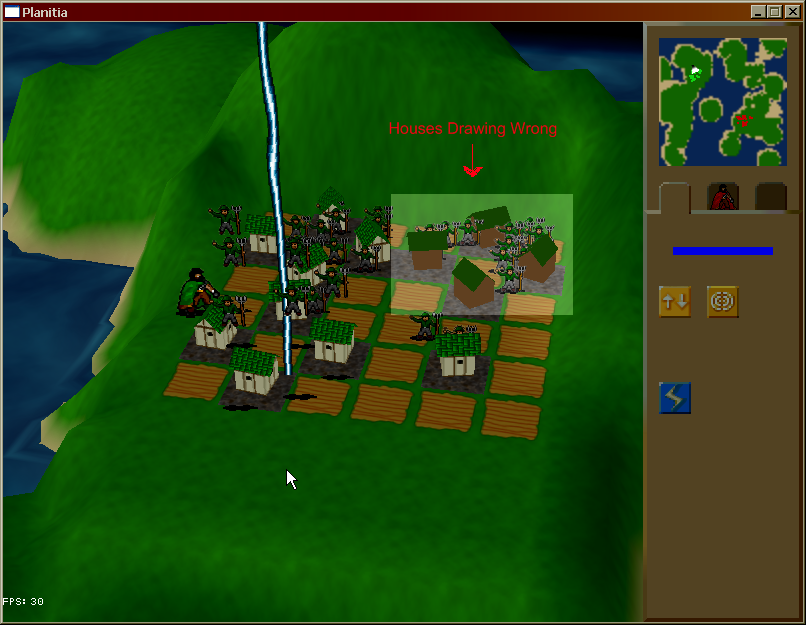
Huh...the paint's run.  But I used Krylon!

Note that some of the houses are drawing just fine, while others are drawing as green-and-brown smears. It’s not awful, but it’s like a pimple on an otherwise attractive face – it’s all you notice.

Now, it’s obvious what is happening – the houses that aren’t drawing right are losing their texture coordinates. The renderer no longer draws the entire texture over the house but just a single pixel from the texture – thus, the solid green and brown colors. This happens if all texture coordinates for the mesh are set to 0, 0.

But it’s not obvious why that’s happening. The hardest bugs to debug are the ones that only happen some of the time and DirectX’s infamous undebuggability just makes it worse. So after several evenings of playing around with DirectX’s render states to absolutely no effect I finally just gave up and moved on to other stuff. I knew I’d have to come back and fix this bug eventually and I wasn’t looking forward to it.

And this morning I decided to take another shot at it. My renderer supports two sets of texture coordinates but the second set of coordinates isn’t set on this mesh…perhaps it was picking up the second set accidentally? Let’s turn the second set off completely. Damn! That still doesn’t fix it! How about if we specify the same set of coordinates for the second set as the first? Holy smoke, that still doesn’t fix it…

Now, at work I’ve been working on my first renderer in a production environment. It’s for a Kaplan SAT program. I’m working on the PC version and I was having trouble with a cartoon shader I was writing. Searching “debug vertex shaders” brought up several recommendations to “just use PIX”.

PIX? What’s that?

It’s the official DirectX debugging tool. It’s included with the DirectX SDK. And I had no idea it existed. Mostly because nobody told me. (Baleful glare at all my programmer friends.)

With PIX I was able to figure out what was wrong with my shader at work, so I decided to use it to try to fix my bug on Planitia.

PIX is pretty easy to use. You start by creating a new experiment:
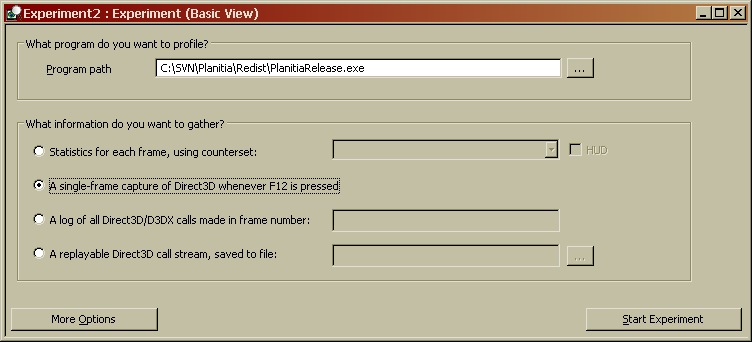
Point the Program path field to the executable you want to debug, then choose one of the four options below it. Options 1 and 4 provide the most data, but if you’re just debugging something it’s probably too much (it’s much more useful if you’re optimizing). I like option 2, where PIX takes a “snapshot” of what DirectX is doing whenever you press F12.

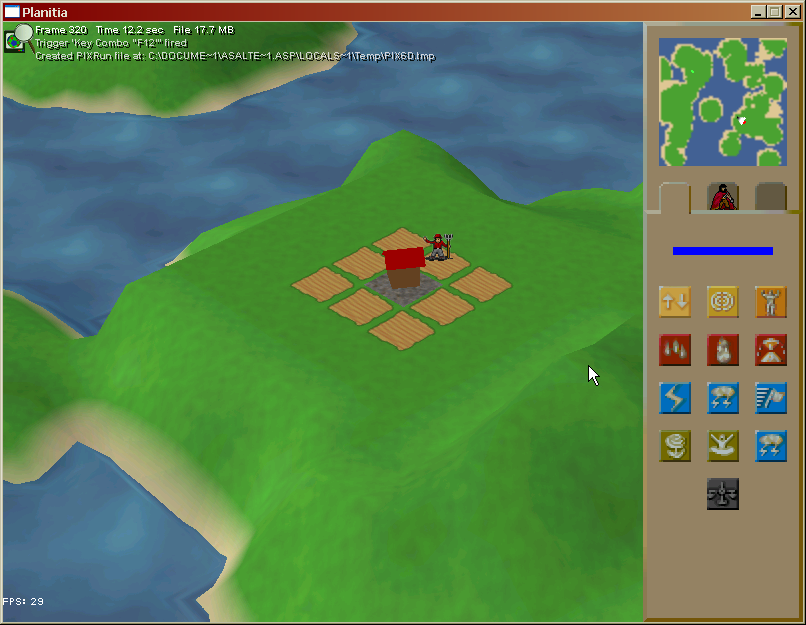
Click “Start Experiment” and your program will run. PIX will add some text to show you that it is functioning properly:

Now it’s running. To debug my problem I panned the camera over to a house that wasn’t drawing correctly and hit F12.
Now when I exit the program PIX brings up the results of the experiment.
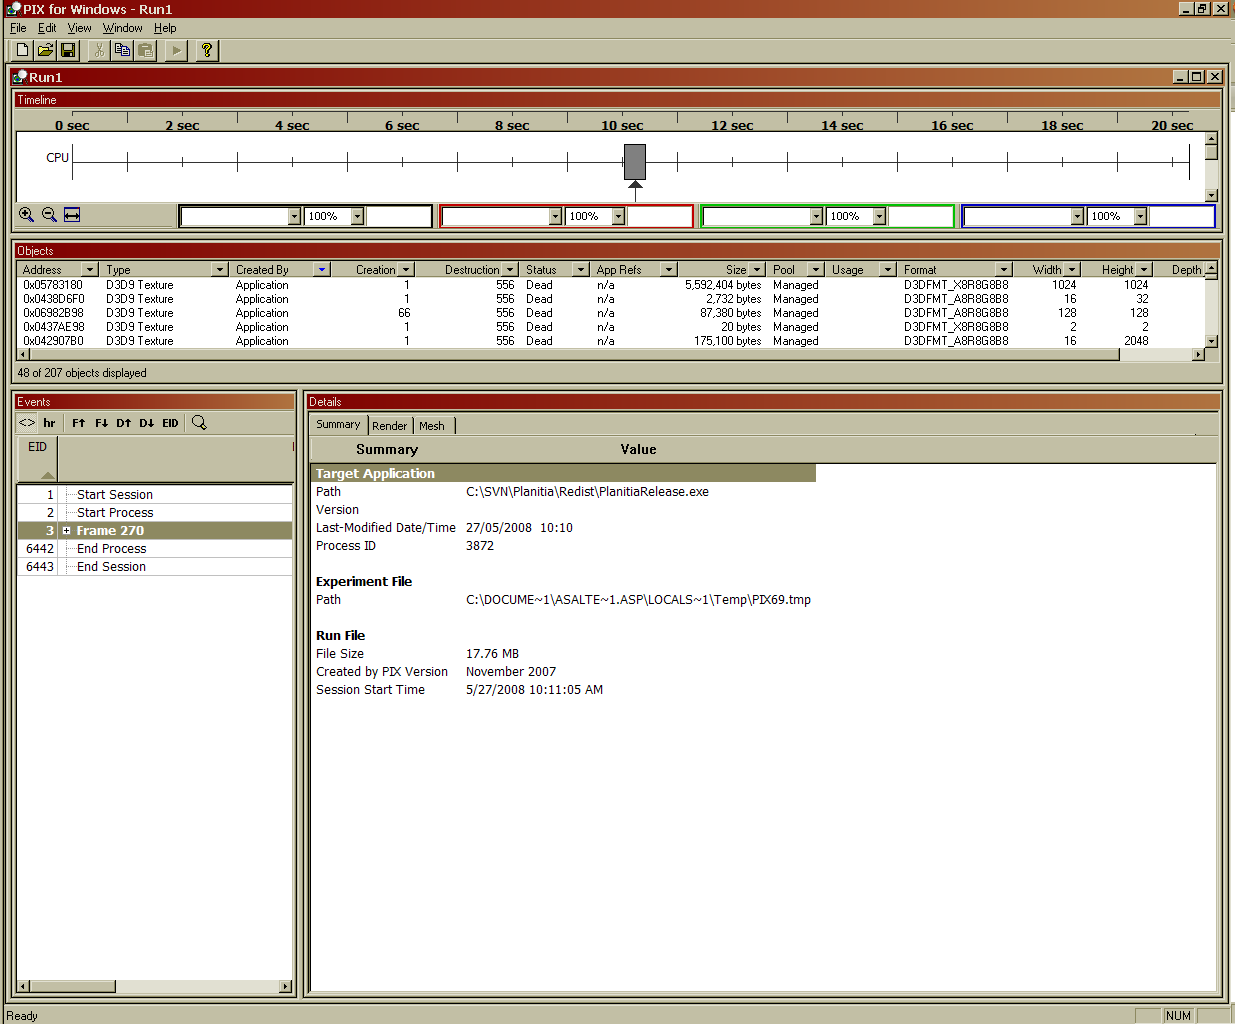
Now we’ve got a TON of information about what DirectX was doing during the frame we captured. Let’s look at the Events window…
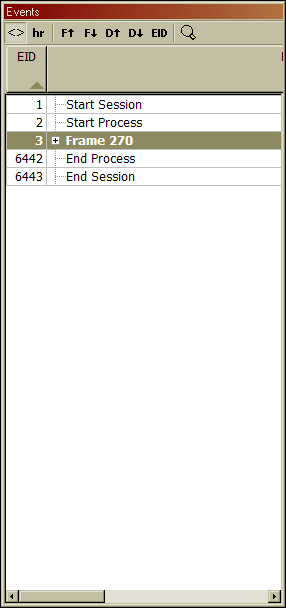
And expand Frame 270.
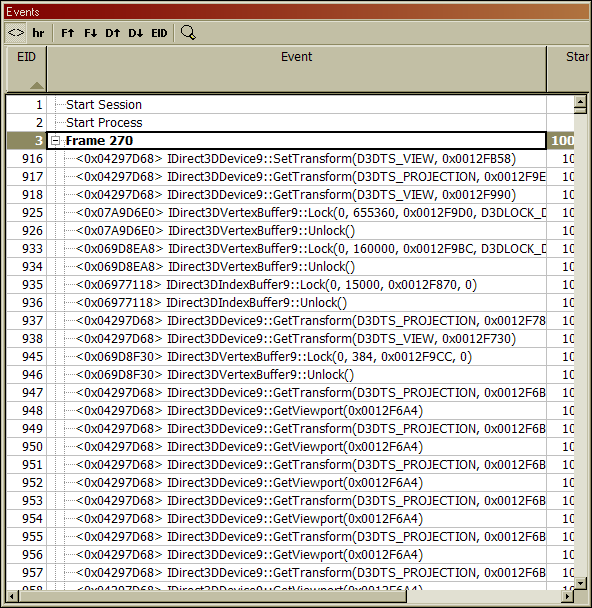
We now have a list of every. Single. Freakin’. Thing DirectX did during that frame. DirectX is inscrutable no more!

Not only do we have the list of commands, but the Details window shows exactly what that command drew:
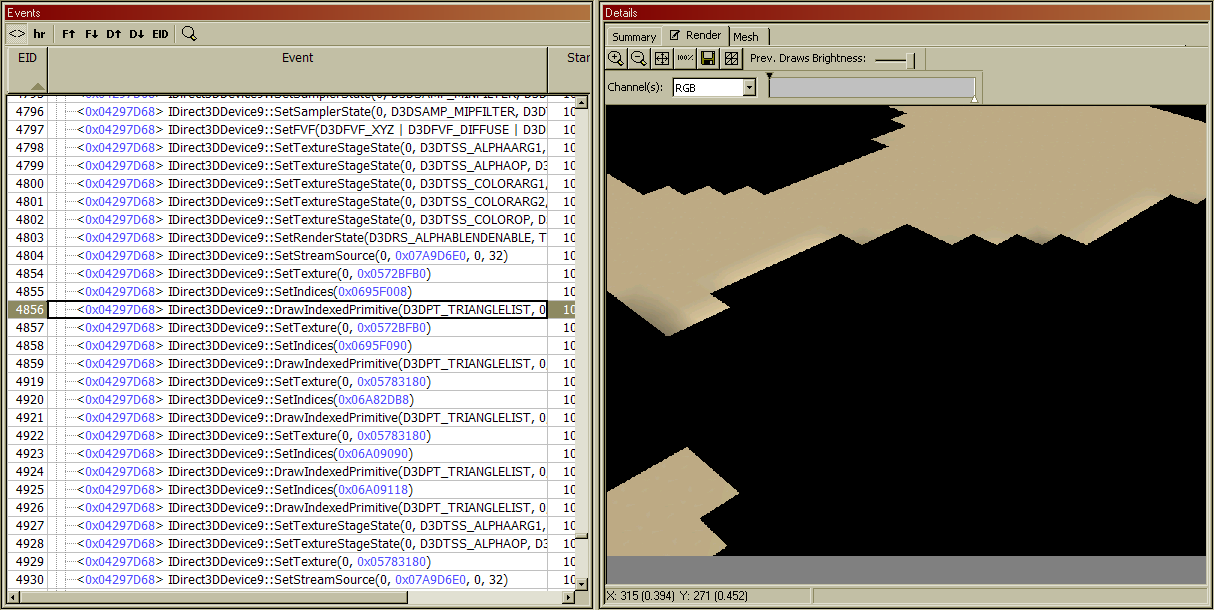
So let’s step through the list of draw commands…ah, here’s the first house it drew. This house was drawn correctly (except that since it wasn’t on the screen, it wasn’t actually drawn at all, as shown by the Viewport window). Notice the columns that show the texture coordinates for the house.
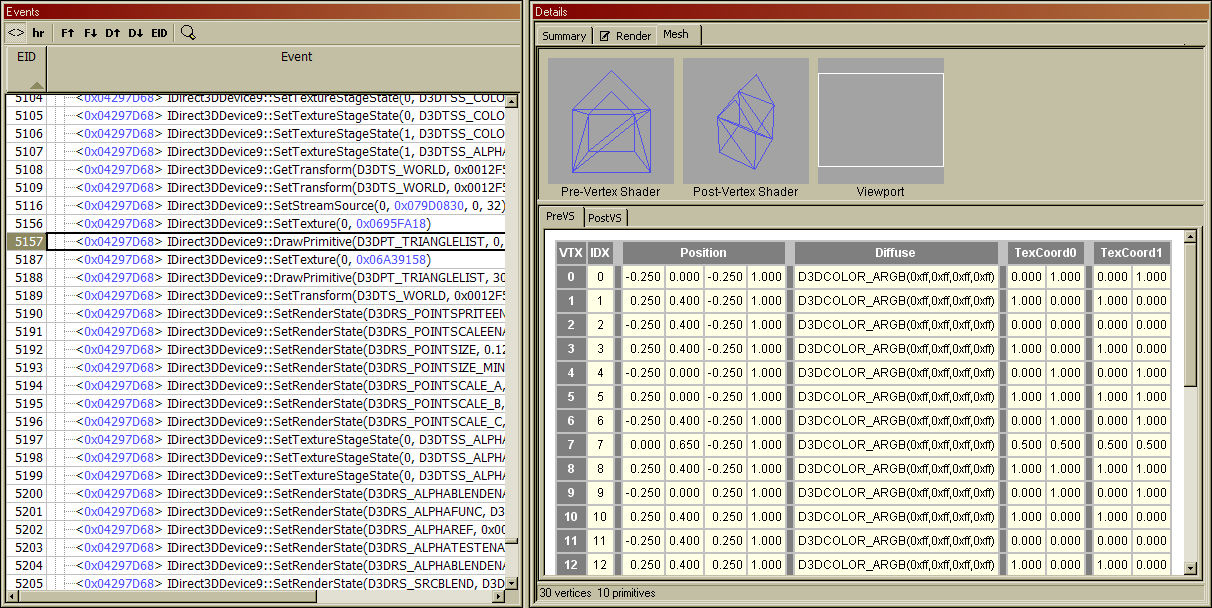
Let’s keep stepping…wait, what the hell?

A problem drawing a point sprite list? Why is it drawing a point sprite list? There aren’t any point sprites in the scene! Wait a minute, I’ll bet…
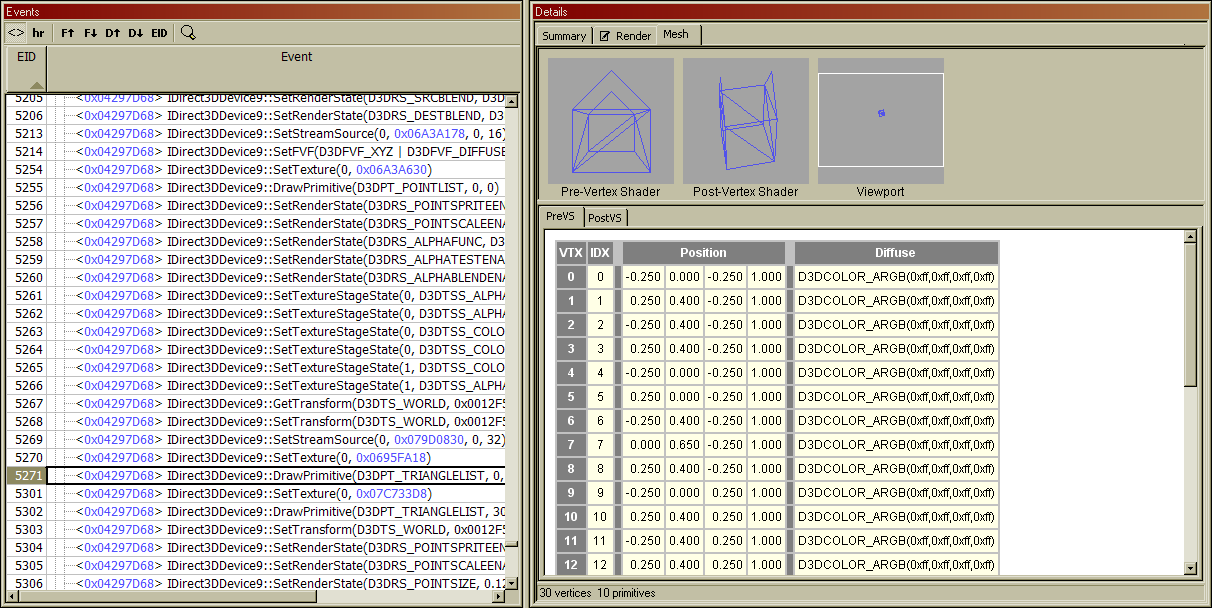
Yep. The very next thing it tries to draw is the broken house. Notice that the texture coordinates are now missing.

And now I know what the problem is. I was calling Draw() on a point sprite system that didn’t actually draw any point sprites. This put the renderer into “point sprite mode” – and point sprites don’t have any texture coordinates. Now, sometimes the renderer would fix itself on the next draw call – and sometimes it wouldn’t, and the house would be drawn with no texture coordinates.

The fix: change this code:

To this code:

Time taken: ten minutes.

Minor lesson learned: I shouldn’t call DrawPrimitive() if I don’t actually have any primitives to draw.

Major lesson learned: I should use PIX – and I shouldn’t ever complain again about DirectX being undebuggable.

“No. There Is Another.”

It’s not just me! I’m not alone! The thing I like most about this is that he’s taking a completely different tack. He’s doing as straight a remake as possible, whereas I, in my Yankee arrogance, have decided to actually try to improve on the original game.

I can’t wait to play it.


500th Submit!

I just submitted my 500th change to my SVN server (I was refactoring some stuff on Planitia in preparation for adding the network code). I guess that’s some kind of accomplishment!


First Ludum Dare Practice Game – Wizard!

This is something I started a while back but didn’t get too far with. Now I’ve picked it back up and expanded on it in order to get some practice writing platformer mechanics.


Time to Level Up

I’ve been thinking that it’s about time to start challenging myself again. Yes, yes, Planitia…but there’s something else I’ve been wanting to do.

I’ve mentioned the self-confidence problems that I’ve had in the past and while I’m a lot better (look, Ma! I’m writing in public!) there is one thing I still don’t like to do and that is compete. I shy away from testing my skills against other people, because I’m afraid I’ll discover that I suck. Well, it’s time to meet this thing head-on.

Therefore, I am hereby announcing that I will compete in Ludum Dare Eleven, which will be held from April 18-20.

Now, see, in order for this to really work I’m going to need to make a pretty good showing of it. So for the next month I’m going to be making lots and lots of small games. I’m hoping to do at least four and I don’t want any of them to take longer than a week to do. This will get me better at starting out quickly and sand over any edges in my 2D development skills.

So the bad news is that there won’t be any Planitia news for a while. The good news is that there should be lots more news on all the other games I’m doing leading up to the competition.

I’m also going to have to come up with a few good recipes, since one of the categories you’re graded on is food


Collector – A One-Page Game

Bwahaha! The One-Page Game meme grows!

Casey Dunham has now written a one-page game called Collector. Collector is based on a famous arcade game just like my game Sandworm was. Which one? I’ll let you find out yourself 🙂

Casey said that he likes the one-page game format because he’s so busy as a student that he doesn’t really have time for anything more involved. Well done, Casey!


Planitia Update 27: I CAN HAS GAME?!

When I started working on Planitia full-bore again after the holidays were over I mentioned that I’m going to release a new beta by the end of January. I want this beta to have actual gameplay in it, and for that I need three things.

* I need to get the villages spawning new villages. They’ve been expanding for months, but once they hit the pop cap they are supposed to spawn another village nearby.

* I need to put combat back in. I ripped it out for debugging purposes – and I know it’s at least partially broken. That needs to be reactivated and debugged.

* I need to get more god powers implemented. Right now the only two that do exactly what they are supposed to are Flatten and Lightning Bolt.

I got the first two requirements done over the weekend and an amazing thing happened…

It’s a game now.

It’s got a definite beginning, requirements for success, and those requirements can be fulfilled – the game can even tell when you (or someone else) has won. The first time I crushed the AI player and had the game actually feed back to me that I’d won…well, that was a great moment for me personally.

So finally, fourteen months after I started this project (and eight months after it was supposed to have been finished), Planitia is a playable game! It’s not a very good game, but I wasn’t expecting it to be – this game is a perfect candidate for the iterative game design process.

And this means I still have two weeks to polish it up and add features before I post it. I’ve even started adding – GASP! – sound!


An Evening with Richard Garriott

I finally managed to get to another of Warren Spector‘s design seminars last night. This one was with Richard Garriott.

Okay, I’m going to be up front here. Richard is one of my Favorite People. He’s the reason I moved to Austin – when I decided to leave home to get a game development job, I felt that my two options were to move to Austin to work for Origin Systems or to move to San Mateo, California to work for Electronic Arts (please note that this was back in 1990, before they became the Borg). So I’m not going to be particularly objective about his talk.

My one real annoyance was that while Warren started with Richard’s chronology of games, Ultima IV was the last game in the chronology they got around to talking about (other than Tabula Rasa, of course). This was disappointing because I wanted to hear more about the development of Ultima VI and VII myself. But at one point Richard answered a question about dealing with his staff by mentioning that he is very easily swayed by the last person who has talked to him. This neatly explains why he and Warren kept getting off-track.

As a result, the session was a mish-mash of Q&A and Warren and Richard discussing whatever came to mind – Richard gave no formal presentation. That doesn’t mean that the session was boring or pointless – quite the opposite. What it does mean is that the summary that follows is basically going to be as random and haphazard as the session itself.

Richard and Warren did start off with the chronology, with Richard talking about his upbringing. His father was a NASA scientist who later became an astronaut and was constantly bringing experiments and equipment from NASA home that Richard got to play with; he mentioned that one time he got to use a image intensifier tube years before it found a commercial application in night vision goggles.

His mother, on the other hand, was an artist. She was the inspiration behind the silver serpent necklace he now wears.

And in high school he was exposed to the three things that combined to lay out his future path – computers, Dungeons & Dragons, and Tolkien’s Lord of the Rings. He became obsessed with the idea of programming a computer to play a role-playing game.

The first computer he used was a PDP-11 terminal. The terminal was never used, and Richard really wanted to try it out. In the first of many benign cons, he actually managed to convince his teachers and principal to let him have complete access to the terminal every day as a school class. The class had no teacher, no tests and no other students – it was just Richard playing around with the computer unsupervised. All he had to do was show progress on a program at the end of each semester to get an easy A. Not only that, but he managed to con them into considering this his foreign language credit – that’s right, the foreign language Richard learned in high school was BASIC. This was what made it possible for him to write his first RPG.

Writing that RPG wasn’t easy. The PDP-11 wasn’t actually at his school; he had to use a terminal and punch paper tape in order to program it, and it took forty seconds for the PDP-11 to respond to input while the program was running. That gives a new meaning to “turn-based”…

The first program he wrote (which he simply called “D&D 1”) was effectively a Roguelike (and dammit, I meant to ask him if he’d played any other Roguelikes before he wrote it, but I forgot). It was so complicated that his father actually bet him that he’d never finish – if Richard did manage to finish the program, his father would split the cost of an Apple II with him.

Of course, Richard did manage to get D&D 1 finished, but it took a while for him to get the Apple – by the time he did he was up to D&D 28! He converted D&D 28 (which he called “D&D 28B”) to the Apple and continued to improve it. This led to him later publishing that same game as Akalabeth, which started his professional game development career.

Richard is pretty proud of his latest game, Tabula Rasa. Now, before I get into this, I just want to say that I really like what NCSoft has been doing in general…even though I don’t play any of their games. They are proving that MMOs don’t have to be fantasy-based and they don’t have to require subscriptions and they don’t have to be Everquest clones. Yes, it’s easy to snicker at the failure of Auto Assault, but NCSoft more than any other company is trying to break the mold of MMOs. And Tabula Rasa is the latest iteration of that. It’s an RPG, but it’s one where positioning is important, you can actually get behind cover, and you don’t roll for damage until you actually pull the trigger on your gun – there is no “auto-attack”.

Tabula Rasa also uses a very interesting system to handle instances and big events in the game. I seem to recall a long time ago mentioning that World of Warcraft would probably have been the best RPG I ever played…if anything I did in the game actually mattered. Anything you do gets undone five minutes later so that someone else in the game world can do it again. Tabula Rasa actually fights this by having things appear differently in the game world for different players based on their own actions. So instead of the world continually getting reset, it appears that the world is moving forward…just at different rates for different players.

But the strange thing is that despite the fact that it’s “Richard Garriott’s Tabula Rasa”, Richard deliberately pulled back from doing a lot of the design work. He described the backstory and game world and made a few key design decisions, as well as creating the Logos language for the game, but after that he mostly oversaw the design and kept it on track rather than doing it himself. He called himself more the “creative director” of the game, saying that Starr Long was the actual director and producer.

He’s actually very proud of Logos, which is a pictographic language (not merely a substitution cypher like the Runic, Gargish and Ophidian languages were). He wanted a language that was just as easy (or rather, just as hard) for an English-speaking person to read as a German-speaking or Korean-speaking person. He based the language heavily off of pictographic languages for handicapped people and considers Logos to be superior to many of them. And he showed us how to read it…it’s actually not hard. For instance, the Logos on this screenshot means, “the fight for control of the universe begins now”. Logos is usually read top-to-bottom rather than left-to-right, though.

It’s pretty obvious to me that Richard has a Reality Distortion Field. When he mentioned convincing his teachers to let him at the PDP-11, Warren interjected that Richard did stuff like that all the time…which jives with Mike McShaffry’s anecdote in Game Coding Complete where he and the other programmers on Ultima IX went into a meeting early in the project with the express intention of convincing Richard that an Ultima VII-style streaming world just wouldn’t be possible in 3D…and came out of the meeting convinced by Richard that an Ultima VII-style streaming world in 3D was obviously the right thing to do.

Then came the question-and-answer session. I asked Richard if he’d ever consider doing a single-player RPG again and he said yes, but that his next project would be another MMO. Much later I asked him if he ever thought we’d see MMOs with the deep world simulation of Ultima VII and he said that hopefully I’d see one when he made one, and that’s probably what his next project would be. So if Richard’s next project turns out to effectively be an improved Ultima Online, I am taking full credit. I put that idea in his head. It was all me, baby.

Let’s see…what else did he talk about…oh, he said that they put up with player-run Ultima Online shards until some of them started charging money, at which point he simply picked up the phone, called the FBI and had them arrested. It’s kind of stupid to do something like that when it’s so easy to find out through your ISP who you are.

Also, to his credit, he took exception when Warren called Ultima Online the first MMO, but pointed out that previous efforts were either very difficult to get into like textMUDs or were linked to proprietary online services like Kesmai and thus had very limited markets. Ultima Online was the first mass-market, internet-based MMO and proved that genre’s viability. Richard had been turned down by EA again and again when he proposed UO to them and was only able to start the project by cornering Larry Probst personally and applying the Reality Distortion Field, which got him $250,000. He was able to create a viable prototype with that $250,000, but in order to get beta testers they needed more money to duplicate and mail CDs, which they didn’t have. So Richard & Co. put up a web page, one of the first Origin and EA ever had, to tell people, “Hey, we’ve got this game and we think it’s going to be great, but if you want to get into the beta test it you’ll have to send us $5 to cover the cost of shipping you a CD.” All their co-workers said they were crazy, but within a week they had 50,000 takers – and this was when the biggest MMO in the world had 15,000 subscribers. That was the point at which Electronic Arts perked up their ears and actually started investing in the project.

He also said that one of the most touching moments he ever had was when he was GMing UO invisibly. He said he was near a player who was fishing (fishing being one of the most popular activities in UO) and was actually wearing shorts and a straw hat to look the part. The fisherman was approached by an adventurer who had obviously just come from a dungeon run and who said something like, “Ho, fisherman! It is obvious that you are poor – you have no armor and weapon! Here, take some of the spoils of my latest adventure!” and started laying money, armor and weapons out on the ground for the fisherman to take (player trading having not been implemented yet).

At which point the fisherman player said, “Stop! You misunderstand! I am a fisherman. I catch my fish, take it into town and sell it, and then spend the money with my friends at the pub. I like this life and desire no other. Be off with you, warmonger!” Richard considered it one of the great accomplishments of his life that he had created a game that people could get so far into.

And I think that’s all I can remember…for now, at least. Like I said, it was a great evening.


Can YOU Make Text Mode Look Good?

Well, can ya? Punk?

This year marks the spectacular Tenth Anniversary iteration of Jari Komppa‘s Text Mode Demo Contest. If you’re not sure what the text mode scene is all about, grab the official invitation demo to get a feel for what the judges will be expecting. The contest ends on December 12, 2007 so you’ve got about a month, and there are links to lots of text mode APIs and resources on the site so you don’t have to start from nothing. Now get out there and show us that text mode doesn’t begin and end with NetHack, soldier!


Practical Direct3D Programming

Or, what I learned writing Planitia and didn’t learn from Frank Luna’s book.
This article will be of most use to programmers who have run through some Direct3D tutorials and know how to draw shapes on the screen but haven’t done any serious Direct3D coding yet. If you’ve read and done the exercises in Introduction to 3D Programming with DirectX 9 then you should be fine. I’m going to be using my game Planitia as my example, since it is by far the most complex Direct3D program I’ve ever written.

Overview

First, let’s talk about what was actually necessary for Planitia.

Welcome to Planitia.

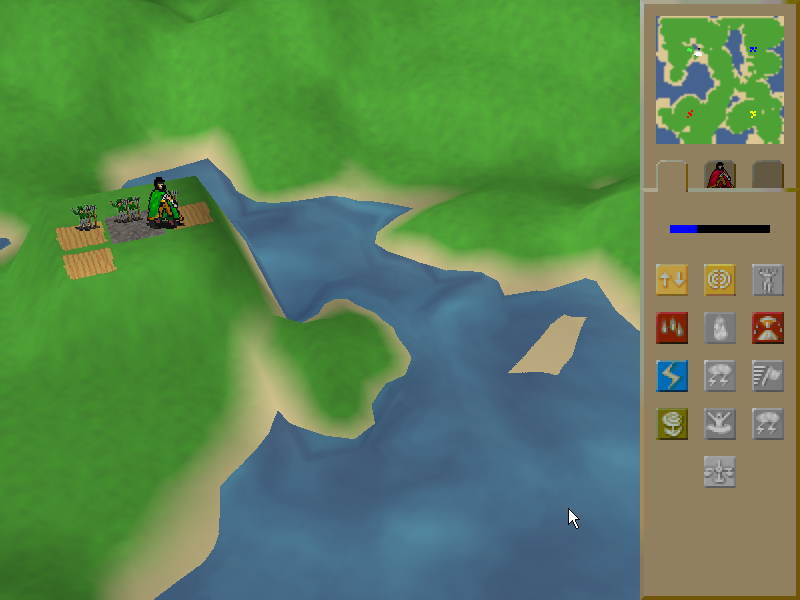
Planitia is a 3D real-time-strategy game, played from a 3/4 perspective. The terrain of the game world is a heightfield and a second heightfield is used to represent water. Units are presented as billboarded sprites (simply because I had no animated models I could use). Other game objects like the meteor are true meshes. So the Planitia engine needed to be able to render all of these at a minimum.

Planitia’s design presented some interesting challenges because the terrain of the entire map is deformable. The player (as a god) can raise and lower terrain to make it more suitable for villagers to live on. Earthquakes and volcanoes can also deform the terrain at just about any moment of play. Thus, it was necessary for the game to constantly check to see if the game world had significantly changed and regenerate the Direct3D data if it had.

Initializing Direct3D

Since this was my first Direct3D project, I deliberately limited the number of technologies that I was going to use. I decided that I would not use any vertex or pixel shaders since I didn’t want to start learning them until I felt I was familiar enough with fixed-function Direct3D. I also wanted to make the game friendly to older hardware and laptops.

To this end, I don’t do a lot of capability checks when I initialize Direct3D. But one check that I did find useful was the check for hardware vertex processing. If that capability check fails, it’s a pretty good indicator of older/laptop hardware and I actually make some changes about how the terrain is rendered based on it (that I will detail in a bit).

Vertex Structure and FVF

My vertex structure is as follows:

class Vertex
{
public:
	Vertex();
	Vertex(float x, float y, float z,
		DWORD color, float u, float v, float u2 = 0, float v2 = 0);

	float _x, _y, _z;
	DWORD _color;
	float _u, _v;
	float _u2, _v2;
};

And my FVF:

DWORD FVF = D3DFVF_XYZ | D3DFVF_DIFFUSE | D3DFVF_TEX2;

Notice that there are no normals. I’m using baked lightning for Planitia (as described in Frank Luna’s book – indeed, I used his code) and thus normals aren’t necessary. I am using two sets of UV coordinates because I “paint” various effects on top of the normal grass for the terrain (more on that in a minute).

Division of Labor – Creating the Index and Vertex Buffers

Okay, so what exactly is a Planitia map?

A Planitia map consists of a 64×64 grid of terrain cells. Thus, it must be drawn with 65×65 vertices. Each map has a heightfield of 65×65 values, as well as a 64×64 array of “terrain types”. Terrain types are identifiers I created that basically record what kind of terrain is in the cell. Values in the heightfield range from 0 to 8. If all four corners of a cell have a height of .2 or less, that cell is underwater has terrain type TT_WATER. If one corner of the cell is .2 but others are higher then the terrain type is TT_BEACH. Otherwise the terrain cell is TT_GRASS. Other terrain types like lava, flowers, ruined land and swamps are drawn over grass terrain and have their own terrain types.

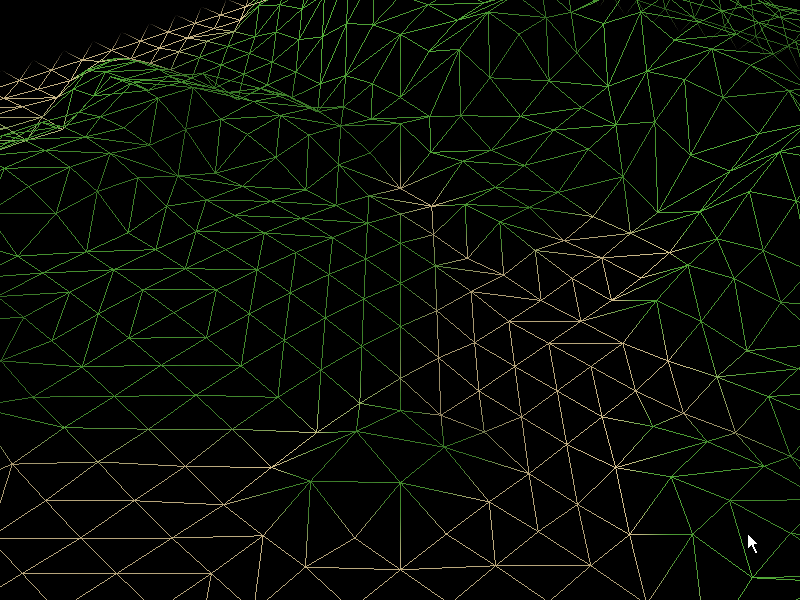
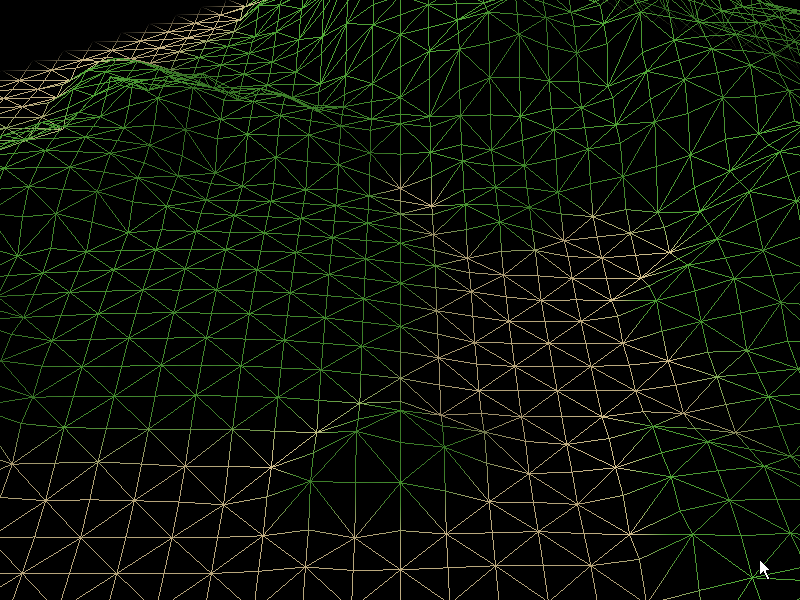
And here’s my first fast/slow split. If I detect that hardware vertex processing is available, then each cell consists of five vertices – one each for the corners and one for the center. Drawing a terrain cell requires drawing four triangles.

Four triangles per cell!

If hardware vertex processing is not available, then I only use four vertices for each cell and only draw two triangles.

Two triangles per cell!

I set the UV coordinates across the entire terrain to the X/Y position of vertex in question. Thus the UV coordinates of vertex (0, 0) are (0, 0), the UV coordinates of (0, 1) are (0, 1), etc. This allows textures to tile properly while also giving me access to a few tricks (which I will get to in a minute). You’ll notice that this means that I’m not specifying what texture to draw with the UV coordinates – I do not have all my terrain textures on one big tile. That’s a good technique but I couldn’t use it for Planitia.

The diffuse color of each vertex actually stores two different sets of information. The RGB values are combined with the grass texture based on the lighting for that particular cell (again, using the pre-baked lighting code from Frank Luna’s book, page 224). The alpha value isn’t used for lighting. It’s actually used to create the beach effect, where sand blends evenly into grass. There’s more information on how this works in the Rendering section.

I actually create eight vertex buffers – one for each terrain type. Each vertex buffer contains data about the geometry of the terrain mesh and the shading of the terrain, but doesn’t contain any data about what texture to draw or how the vertices form into triangles.

Once the vertex buffers are done, I create index buffers to sort the vertices into triangles. Again, there’s an index buffer for every terrain type. And again, if hardware vertex processing is supported I create four triangles per quad; otherwise I only create two…but I use a technique called triangle flipping.

Triangle Flipping

Here’s how it works: for every cell in the terrain that you create, you test its upper-left corner against the upper-left corner of three other cells – the one diagonally up-left from the target cell, the one to the left of the target cell, and the one above the target cell.

If the difference between the target cell and the one to the upper-left is higher than the cell to the left and the one above, we flip the cell by specifying a different set of vertices to draw than the standard.

If you didn’t completely understand that, that’s okay. Here’s the code.

float diffA = abs(GetValue(x, y) - GetValue(x - 1, y - 1));
float diffB = abs(GetValue(x, y - 1) - GetValue(x - 1, y));
bool triFlip = diffA > diffB;

If triFlip is false, we create the triangles normally.

No triangle flip.

If the test is true, we create the triangles like this instead:

Triangle flipped.

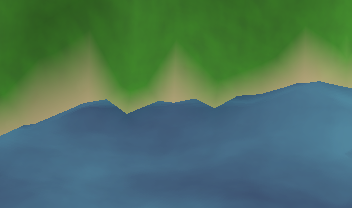
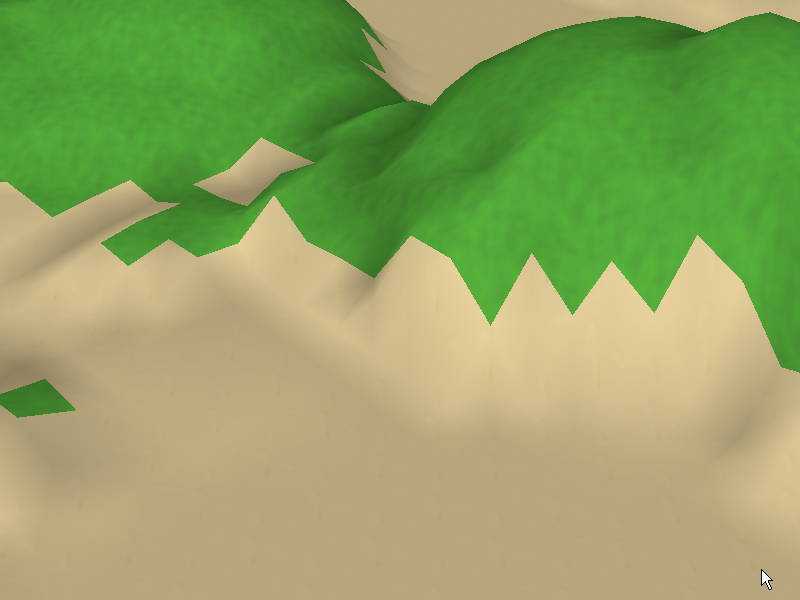
The results are pretty impressive. Here’s Planitia with two-quads-per-triangle without triangle flipping:

No triangle flip.

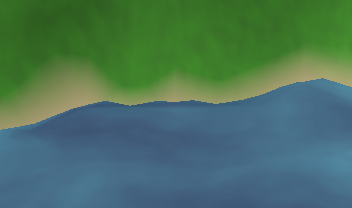
Notice all the jagged edges. When we use triangle flipping, they go away:

Triangle flip.

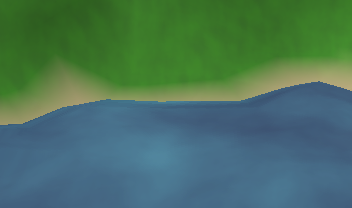
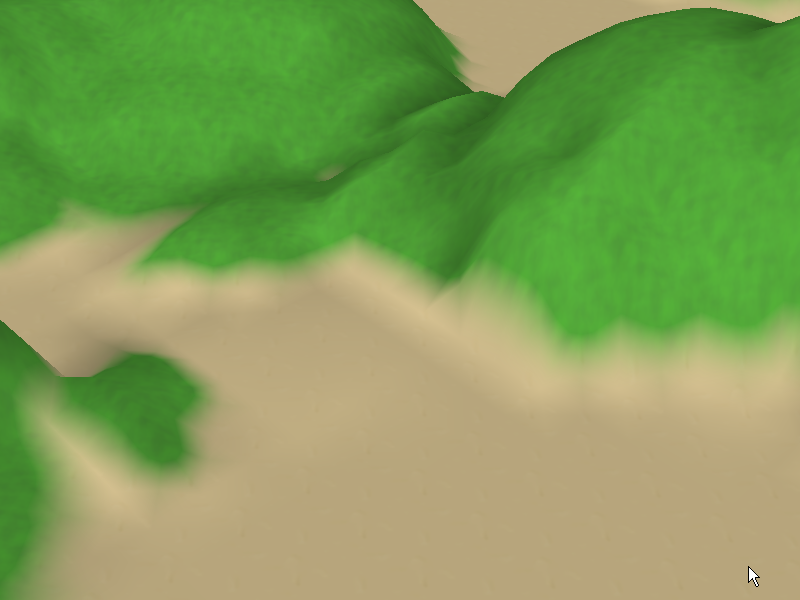
That’s much better – it gets rid of the spikes – but now we’ve got lots of straight lines and the coast looks a bit boring. Using a center point on our quads looks even better:

Center-point doesn't need traingle flip.

Now it looks smooth and interesting. Which is why I do that when the hardware supports it.

Drawing The Scene

All right, the vertex and index buffers are created and it’s time to actually draw the terrain. Here’s the procedure I use.

The first thing I do is to turn alpha blending off. Then I draw all eight of my vertex buffers. I set the texture to be drawn based on the terrain type I am drawing (this is why data about what texture to draw isn’t stored anywhere in the vertex or index buffers). If the terrain type is “water” or “beach”, I set the sand texture and draw it. If it’s anything else, I set the grass texture and draw it. The result:

Oooh.  Hope the next pass makes it look better...

Time to do some blending. I turn alpha blending back on and set the grass texture as the active texture, and then I redraw the vertex buffer for the beach. Since blending is on, the grass is drawn fading out over the sand, resulting in a sand-to-grass effect. Now it looks like this:

Oooh!  Yes it does!

This technique is called multipass multitexturing. Instead of…

Oh, good grief…

Must…resist…

Can’t…stop…

Leeloo Dallas multipass!

There. Got it out of my system.

Instead of using multiple sets of UV coordinates and setting multiple textures at once, you draw the same geometry twice with different textures. The upside of this is that it’s easy to do and very hardware-compatible. The downside is that you are drawing more polygons than you technically need to, but if you’ve got a good visibility test (which we’ll get to in a minute) it shouldn’t be a problem.

Alpha Masking

This is the one thing in Planitia that I’m proudest of (well, along with the water).

The other terrain types – lava, flowers, ruined land and swamp – are all drawn over grass and are masked so that the grass shows through. This is why I already drew these once with grass set as the active texture. But I’m using an additional trick here. These textures won’t get their alpha information from the vertices and they don’t have any alpha information of their own. They get their alpha information from another set of textures altogether.

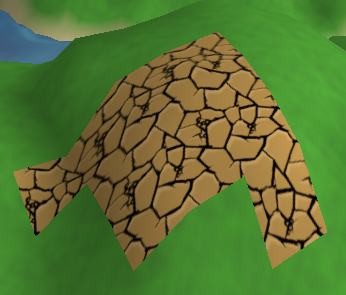
You see, practically any grass terrain cell can be turned into any of the other four types at practically any time during the game. If I simply draw the cell with the new texture, I get big chunks of new terrain on top of the grass:

Oooh!  Blocky!

I can alter the textures so that they fade out at the edges, but that still gets me soft tiles of terrain lined up in neat columns and rows.

What I really needed was for tiles that were next to each other to sort of glom together…and be able to do so no matter how they were configured.

Hmmm…

And then I remembered that I’d seen this problem already solved in Ultima VI! The slimes in that game would divide if you hurt them without killing them, but instead of making smaller slimes they’d make one big mass of connected slime. So I grabbed the Ultima VI tiles to take a look at how the Origin guys had done it.

Slime!

Turns out that they had done it by disallowing diagonal connections, thus reducing the number of connection possibilities from 256 to 16, and then they had drawn custom tiles for each connection permutation. This would still look better than either of the previous two solutions.

So I fired up Photoshop and created an alpha mask texture based on the slime texture.

It's the Mask!

The thing was…I didn’t just want to burn this filter onto each of my terrain type textures. I had a couple reasons for this. First, it would make the terrain type textures very specialized. Second, I’d have to make them much bigger to handle the sixteen permutations. And third, it would mean I wouldn’t be able to make my lava move by altering its UV coordinates (more on that in a second).

So what I needed to do was to set two textures – the mask texture and whatever texture I was drawing with. I needed to tell Direct3D to take the alpha information from the mask texture and the color information from the other texture.

I’ve tried to keep this article code-light, but this was tricksy enough that I want to go ahead and post the complete code. So here it is!

First we set our lava texture to be texture 0 and our masking texture to be texture 1.

gp_Display->m_D3DDevice->SetTexture(0, m_LavaTexture->m_Bitmap);
gp_Display->m_D3DDevice->SetTexture(1, m_MaskTexture->m_Bitmap);

In the first texture stage state, we select both our alpha value and our color value to come from texture 0 (the lava texture). Note that I am modulating the color value with a texture factor – I’ll talk a bit more about that in a minute.

gp_Display->m_D3DDevice->SetTextureStageState(0, D3DTSS_ALPHAOP, D3DTOP_SELECTARG1);
gp_Display->m_D3DDevice->SetTextureStageState(0, D3DTSS_ALPHAARG1, D3DTA_TEXTURE);
gp_Display->m_D3DDevice->SetTextureStageState(0, D3DTSS_COLOROP, D3DTOP_MODULATE);
gp_Display->m_D3DDevice->SetTextureStageState(0, D3DTSS_COLORARG1, D3DTA_TEXTURE);
gp_Display->m_D3DDevice->SetTextureStageState(0, D3DTSS_COLORARG2, D3DTA_TFACTOR);

In the second stage we simply select the color value we already had (meaning the lava value) but we overwrite the previous alpha value with the alpha value from texture 1, which is the mask texture.

gp_Display->m_D3DDevice->SetTextureStageState(1, D3DTSS_COLOROP, D3DTOP_SELECTARG1);
gp_Display->m_D3DDevice->SetTextureStageState(1, D3DTSS_COLORARG1, D3DTA_CURRENT);
gp_Display->m_D3DDevice->SetTextureStageState(1, D3DTSS_ALPHAOP, D3DTOP_SELECTARG1);
gp_Display->m_D3DDevice->SetTextureStageState(1, D3DTSS_ALPHAARG1, D3DTA_TEXTURE);

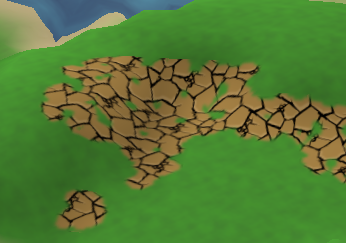
The end result was that I could use one mask plus four terrain textures to get four terrain types that stuck together no matter how they were positioned.

Oooh!  Not blocky!

UV Transformation

The ruin, flowers and slime terrain types are all drawn the same way in the manner I just described, but I did a little extra work on the lava to make it look better.

First, I turn off the diffuse color when I draw the lava using the following render states:

gp_Display->m_D3DDevice->SetTextureStageState(0, D3DTSS_COLORARG1, D3DTA_TEXTURE);
gp_Display->m_D3DDevice->SetTextureStageState(0, D3DTSS_COLOROP, D3DTOP_SELECTARG1);

This means that the lava is always drawn fullbright and isn’t affected by the baked-in lighting. This makes the lava seem to glow with its own light.

I enhanced this effect by using the texture factor. This is simply an arbitrary number that you can set and then multiply the texture color by. I alter it on a per-frame basis to make the lava brighten and darken, thus looking like it’s glowing. Again, this is simply a render state that you set.

gp_Display->m_D3DDevice->SetRenderState(D3DRS_TEXTUREFACTOR, D3DCOLOR_XRGB(redvalue, greenvalue, bluevalue));

And finally I use a UV transformation to offset the lava’s UV coordinates over time, causing the lava to look like it’s flowing. A UV transform is just what it sounds like – it’s a matrix that the UV coordinates are multiplied by before they are applied.

Now, warning warning danger Will Robinson. Whenever a Direct3D programmer starts using this feature for the first time they almost always get confused. They typically try (just like I did) to create a transformation matrix using D3DXMatrixTransformation() or D3DXMatrixTransformation2D() and they end up (just like I did) with a very strange problem – for some reason, scaling and rotation seem to work just fine but translation does not.

That’s because the UV transformation matrix is a two-dimensional transformation matrix and two-dimensional transformation matrices are 3×3 matrices, not 4×4. The scaling and rotation numbers are in the same place in both, but the translation information is on line 3 of the 3×3 instead of on line 4 like the 4×4. This is why scaling and rotation work but translation does not. Put your translation values into the _31 and _32 values in your D3DXMATRIX structure and it’ll work fine.

(Now you may be asking, “Why doesn’t D3DXMatrixTransformation2D() produce a 3×3 matrix?” Good question. I have no idea why, but it doesn’t.)

Here’s the result:

All of these little tricks were suggested to me by Ryan Clark. Except the alpha masking, which is the one thing I came up with on my own which is why I’m ridiculously proud of it.

A Good Raypicker Is A 3D Programmer’s Best Friend

You can’t really write a 3D game without a raypicker, and this is where I’m going to ding Frank Luna a few points. While he does present the concept behind raypicking and some of the math behind it, in the end he cops out and does a line/sphere test once the ray has been transformed into world space. This is accurate enough for picking objects in a 3D world, but it’s not accurate enough to pick polygons within an object, and that’s exactly what I needed. I needed to be able to tell exactly in what triangle (or at least what cell) on the terrain the user clicked.

I made some manual improvements to the raypicker but it never seemed great. So I used a little google-fu and came up with…well, it’s pretty much the perfect ray-triangle intersection test. C source is included, which I was able to drop into my code pretty much unaltered and I was amazed at how much better it worked without any discernable performance hit. Get it, use it, love it.

(Not) Seeing the Unseen

“But why?” you may ask. “Sure, raypicking involves some 3D math, but it doesn’t involve 3D rendering, now does it?”

Actually, it does, because you can use a raypicker to find out which parts of your world are visible and which aren’t, and only draw the visible parts.

Which means that when I talked about how I fill out the index buffers above, I left out a step. Sorry, but it’s a big step and deserves a section of its own.

I think the most important thing I learned on this project was just how slow drawing triangles is. It’s slow. It’s dog-slow. It’s slow as Christmas. Slow as molasses flowing uphill in January.

When I first started programming I thought that a Planitia map would be small enough that I wouldn’t have to do any visibility testing. But it turns out that you can test your entire game world for visibility and compile a list of the visible triangles in less time than it takes to just draw the whole world. Even if your world is just a little 64×64 heightfield and some billboarded sprites.

That’s how slow drawing triangles is.

In case I haven’t made my point, drawing triangles is damn slow and you should only do it as a last resort. It’s so bad that actually having to draw a triangle should almost be seen as a failure case. Your code should not be gleefully throwing triangles at the hardware willy-nilly. Indeed, it should do so grudgingly, after forms have been filled out in triplicate. And duly notarized.

“Enough!” I hear you cry. “We get it! Drawing triangles is slow! Now would you please tell us how you did your visibility testing?”

Oh, right, the visibility testing. Well, there are actually two techniques I use.

The first is a simple distance test from the center of each cell to the camera’s look-at point. If the distance is larger than 25 (an arbitrary number I arrived at through experimentation) the cell cannot possibly be visible. This very quickly excludes most of the terrain on the first pass. There are 4096 terrain cells in a Planitia map; this first pass will let no more than 1964 (25 * 25 * pi) of them through.

In this video I have drawn the camera back so that you can see the circle of passing cells that moves as the camera does.

Now, that’s good, but it’s not good enough. Typically fewer than five hundred cells are actually visible and the circle test still has us drawing almost four times as many. So all the cells that passed the first test now go to the second test, which involves the raypicking code. Actually, it involves the inverse of the raypicking code. Instead of projecting a ray from screen space into world space, we project a point from world space into screen space.

For each cell, I take its four corner points and then project each one from world space into view space and then into projection space. This “flattens” that point into a 2D point that represents the pixel that point would be drawn as on the screen.

If any of these four points are inside the screen coordinates (which for Planitia is 0, 0 to 800, 600) then at least part of the cell is visible and the cell should be drawn. If all four of the points are outside the screen coordinates then the cell is not visible and should not be drawn.

The function I use for this is D3DXVec3Project(); it makes this procedure very easy.

Again, I’ve drawn the camera back in this video so that you can see how the visible area moves with the camera.

Only cells that pass both tests have their indices added to the index buffer, and thus it is the index buffer that limits how many triangles are drawn. The final result? We only draw what can be seen – and the game runs a whole lot faster.

Old Man River

And now for the last bit – the water.

Planitia’s water is its own heightfield. It uses the same vertex structure and FVF as the terrain. It’s a four-vertex, two-triangle heightfield and I don’t use triangle flipping on it. It’s pretty darn simple.

On the other hand, I do use an index buffer for it so I can do the same visibility tricks I do for the rest of the terrain.

The heightfield is updated fifteen times a second. During this update new heights are calculated based on a formula that changes over time, thus the heightfield seems to undulate. Yes, I could have used a vertex shader, but please recall what I said at the beginning about limiting the technologies I’m using.

While an undulating heightfield is nice, if the texture doesn’t animate the water can look more like blue slime. Populous: The Beginning has this problem.

So the second trick is to get the water texture to animate, and that is all done with the UV coordinates. I am not using a UV transformation matrix like I did for the lava, because that transformation matrix is applied to every UV coordinate identically and I needed to be able to customize them. So the UV coordinates are all individually calculated. And then hand-dipped in Bolivia chocolate before being delivered in a collectible tin.

The water texture.

The first thing we do is to simply add the current game time in seconds to all the UV coordinates. That gets the water moving.

The second thing we do is to add a very little bit of the camera’s movement to the UV coordinates. This is subtle but works really well, especially if your water texture incorporates reflected sky. Basically it makes it look like the reflected sky is moving at a different rate than the water, which it would be in reality. In the following movie, look at the edges to see the effect most clearly.

Now for the really clever bit. I add the same offset that I’m using to make the water undulate to the UV coordinate for that vertex. That is, if my undulation function says that the vertex is .015 above the normal height, I add .015 to the UV coordinates of that vertex. This has the effect of making the texture seem to squash and stretch as it moves. I think this does more to actually sell the idea that the water is flowing than anything else.

Now for one more thing. I actually add the height of each vertex in the terrain heightfield to the UV coordinates in the water heightfield. This has the effect of making the water “bunch up” around the land.

I could probably improve the water if I added another heightfield on top of the existing one, moving faster and in a different direction. If I did that, I would probably move the camera movement to the top heightfield, since it represents reflection movement. I may do this at some point, but I think Planitia’s water looks good enough for now.

And I think that’s about it. Planitia will be released with full source code so there won’t be any mysteries about how I did anything. If you’ve read this and you’re trying to replicate something I’ve done and are having trouble, please feel free to contact me at anthony.salter@gmail.com. And good luck with your own 3D programming endeavors!